This post may contain affiliate links. I try to make my posts as helpful as possible and have great products easy for you to access. The use of these links provides me a small commission at no cost to you. As an Amazon Associate, I earn from qualifying purchases.
This post is packed full of RV remodel ideas, tips, and tricks. Scroll through for product recommendations, remodeling hacks, and important safety tips for your renovated camper.
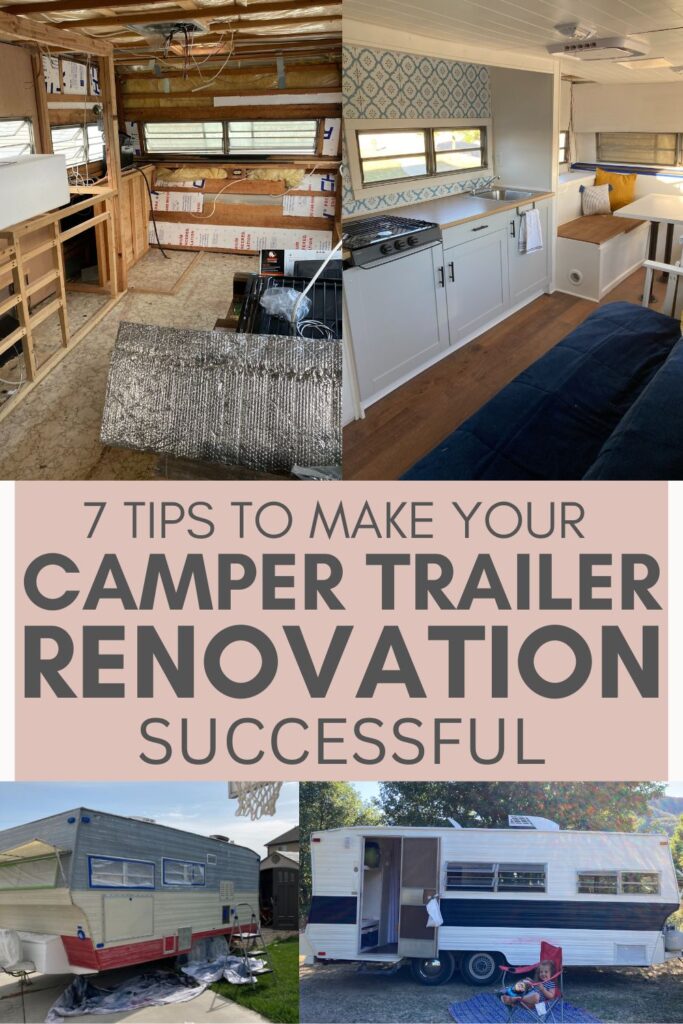
Camper Remodel – How It All Started
For quite a while I had dreamed of buying and renovating an old camper trailer to use with my family while camping. I always thought I’d do it several years in the future when my kids were older.
But then I stumbled upon a trailer for sale that seemed perfect.
Those first few weeks of owning the trailer were a total emotional roller coaster. I literally couldn’t sleep at night. I would swing from beyond excited to beyond terrified. There were moments with squeals of joy and moments of discouragement and doubt.
I learned a lot of lessons while renovating this trailer. Not just how to renovate a trailer but about life. Check out my About Me page for more on that.
In this post, I’ll share more of the practical things I learned on the journey. I had no idea what I was doing most of the time, and I definitely made a bunch of mistakes.
But if you are looking to take on a trailer renovation, hopefully, you’ll find some of this information helpful. And it will give you some camper trailer remodel ideas.
7 Tips to Make Remodeling an RV Successful
- Seal/Waterproof RV Exterior
- Insulate and Reinforce Bones
- Trailer Weight and Weight Distribution
- Add Furniture and Cabinets
- Install Paneling – Ceiling and Walls
- Painting the Exterior
- Plumbing, Electricity, and Propane
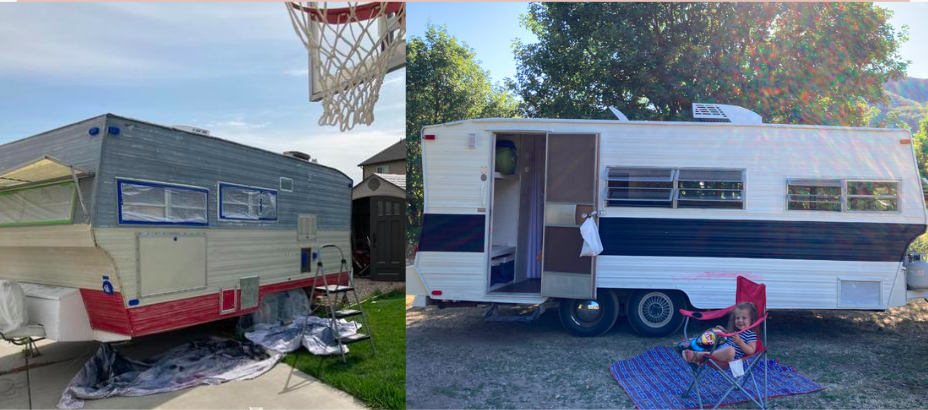
Camper Remodel- Before and After
This is a quick video I put together of my renovated RV experience.
(During the second half of the remodel, I did a terrible job of recording and documenting because I was rushing to get it done in time for camping season. But either way, it’s highly satisfying to see the progress and the before and afters!)
7 Tips to Make Your Renovated RV Successful
1. Waterproof/Seal the Exterior of Renovated RV
Camper trailers have a lot of seams and the potential for leaks which leads to water damage and mold problems. So it is essential to dedicate some time to making sure you have protected and sealed all areas that may be vulnerable to water.
For all my RV seams I used sickaflex. It is in a tube similar to caulk, but it is highly durable. It can be used on all types of materials and can be painted. My neighbor who works at a trailer repair shop recommended this product to me because it’s what they use in their shop. And I haven’t been disappointed!
Another product I used for the roof of my trailer was flex seal liquid. It is like a thick rubbery paint. I poured it in patches on my roof and spread it out with a paint roller on a stick. This hardly took any time and just added another layer of protection to the roof. Flex seal has a lot of cool products that may be helpful as you work to seal your RV exterior.
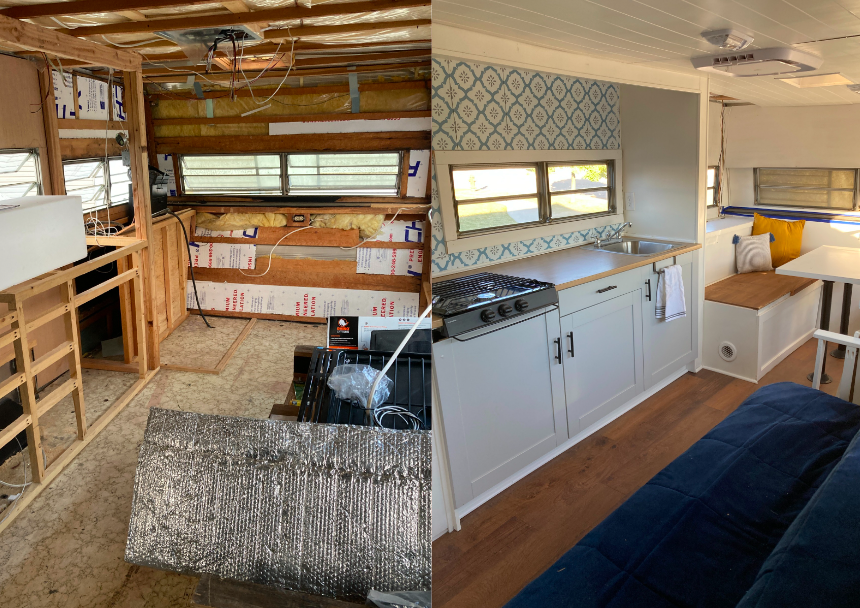
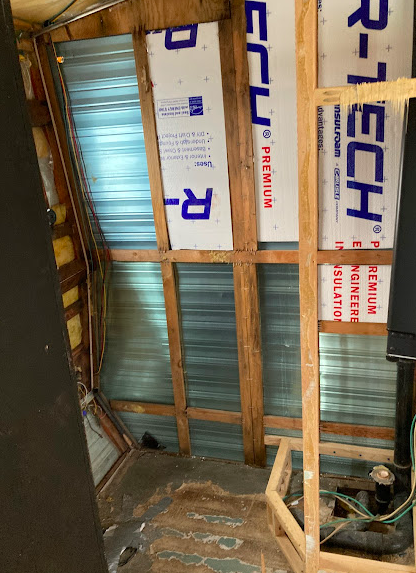
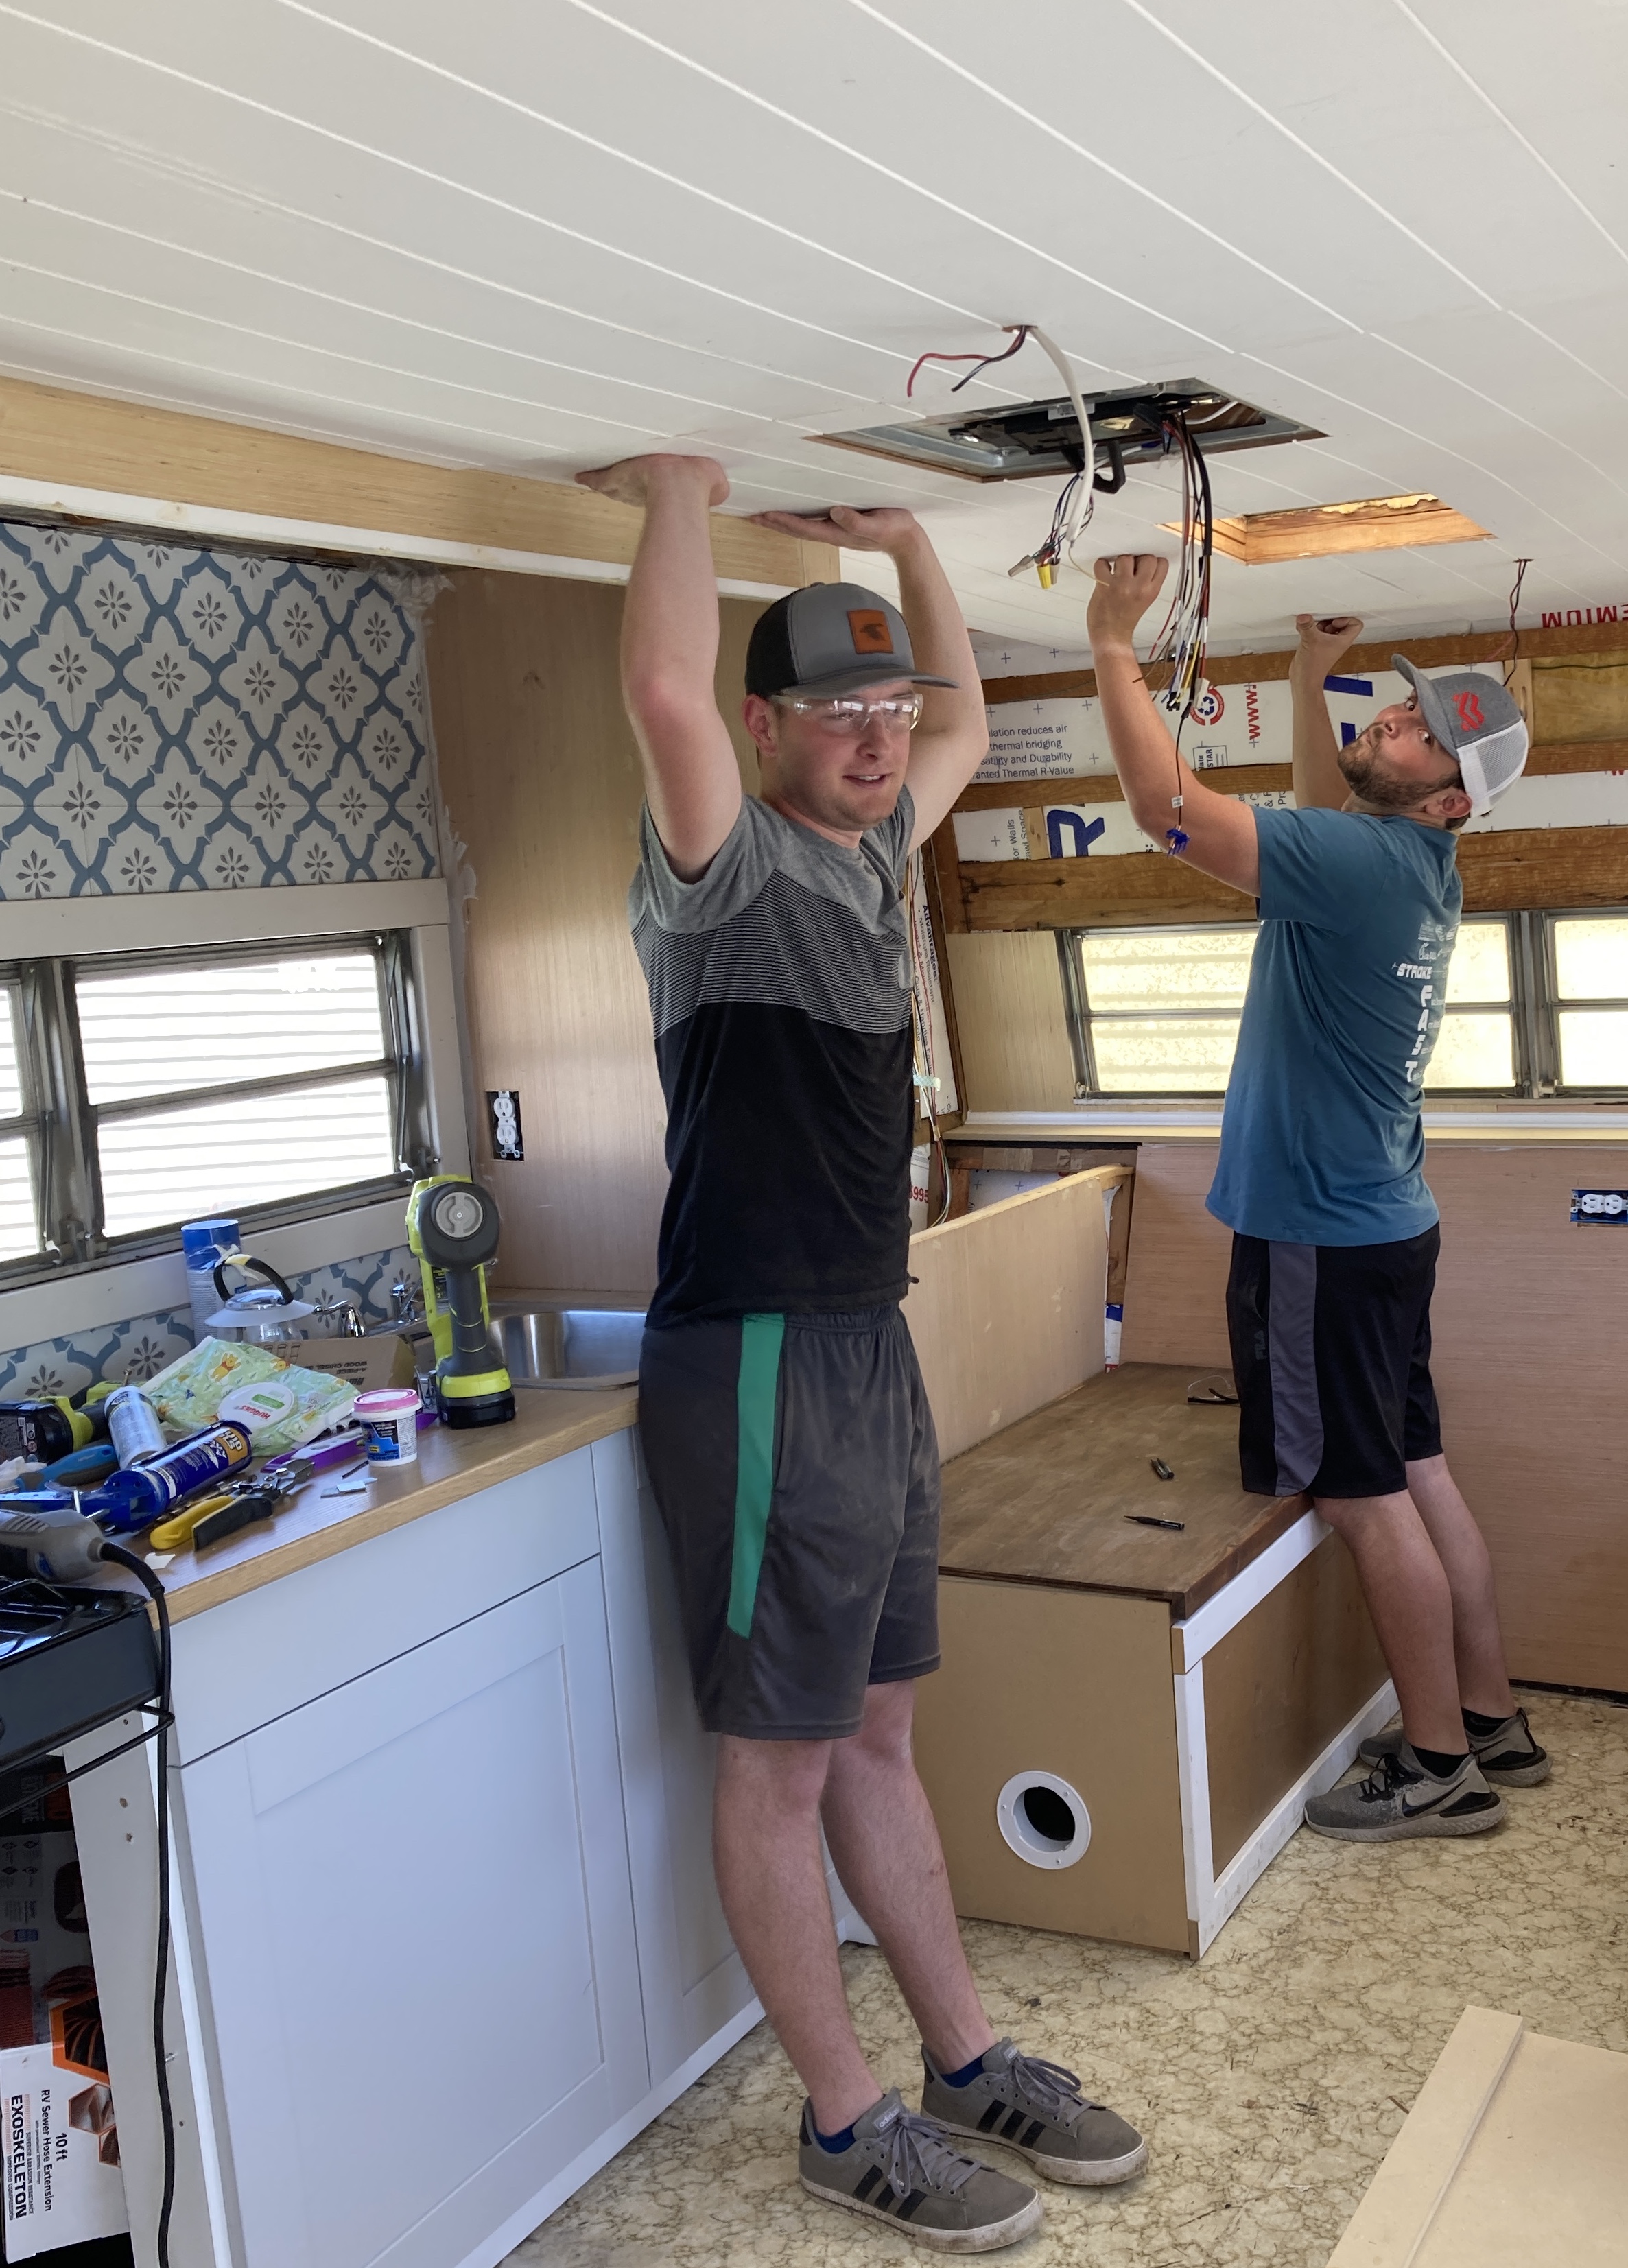
2. Bones and Insulation on RV Remodels
If you are doing a complete renovation down to the bones, you’ll want to make sure your camper trailer is well-insulated and has a good structure for your remodel plans. What I mean by that is, if you will be adding new paneling, you’ll want adequate studs to nail into. If you plan to hang a mirror, hooks, or anything from the walls, place additional reinforcements in areas you think you may need them. I used 2x2s for mine.
Once you feel satisfied with your trailer bones, you’ll want to focus on insulating. Good insulation will help keep your camper warm on those cold nights and cool on those hot summer days. Additionally, a well-insulated camper is going to use less power and propane.
This is the insulation I used for my trailer. It is moisture resistant, easy to cut to size, and really affordable. I would measure, cut, and apply liquid nails to each piece. Then push it into place making sure it was a snug fit. I filled any gaps with scraps to make sure everything was well covered.
3. Trailer Weight and Weight Distribution on Renovated RV
When you are doing a travel trailer renovation, you naturally will end up altering the amount of weight. Here are a couple of really important things to remember in regard to this.
First – know your RV weight. If you know your make and model you can probably find it on Google. You want the weight after your remodel to be as close as possible to the weight before the remodel. I tried just keeping in mind that anytime something was taken out, whatever was going back in needed to be similar in weight.
Second – the weight in your trailer needs to be balanced. It is recommended that 60% of the weight in your trailer be in front of the axle (on the side closest to the hitch pulling the RV). So just be cautious with where you place weighty items. Failure to follow these guidelines can lead to dangerous fishtailing. The video below does a great job of showing the importance of weight distribution.
4. Adding Furniture and Cabinets to your Travel Trailer Renovation
Kitchen Cabinets:
I used this IKEA kitchen cabinet for my trailer. It happened to be the perfect size, which I was thrilled about. It was also nice because as you know with IKEA, it was in a million pieces, which was necessary to fit it through the front door. So don’t make the mistake I almost did, and buy a preassembled cabinet.
I added cupboard handles and these magnetic catches to prevent the doors from swinging open while driving down the road.
The provided countertop was easy to cut into for my sink and stovetop.

Beds:
I put two beds in my camper trailer. One converts from the table, and the other is a couch that converts to a bed.
My table bed was a combination of two storage benches that I build out of 2x2s and paneling. I added 1/2″ plywood for the seat/storage lid. For the tabletop, I used this IKEA desk topper (I found one for sale for $8, so keep an eye out for deals!). These are the RV table legs I used that made converting it to a bed possible.

For the couch/bed, I used a futon mattress and built a box with a sheet of plywood that folds out to the width of a full-size mattress. I built supports to hold the fold outside up when it is being used, as well as arm wrests that add additional support when it is folded over. This has worked fine for us, but if I do this again, I would try to find a futon frame I could just anchor into the flooring.
Camper Bathroom Remodel:
This is the toilet I purchased. It has worked great and was easy to install. I used a lightweight vanity for the sink. I used this for the accordion door, it was easy to install and cut to the custom size I needed. These shelves were perfect to put my hand towel, soap dispenser, and extra toilet paper.

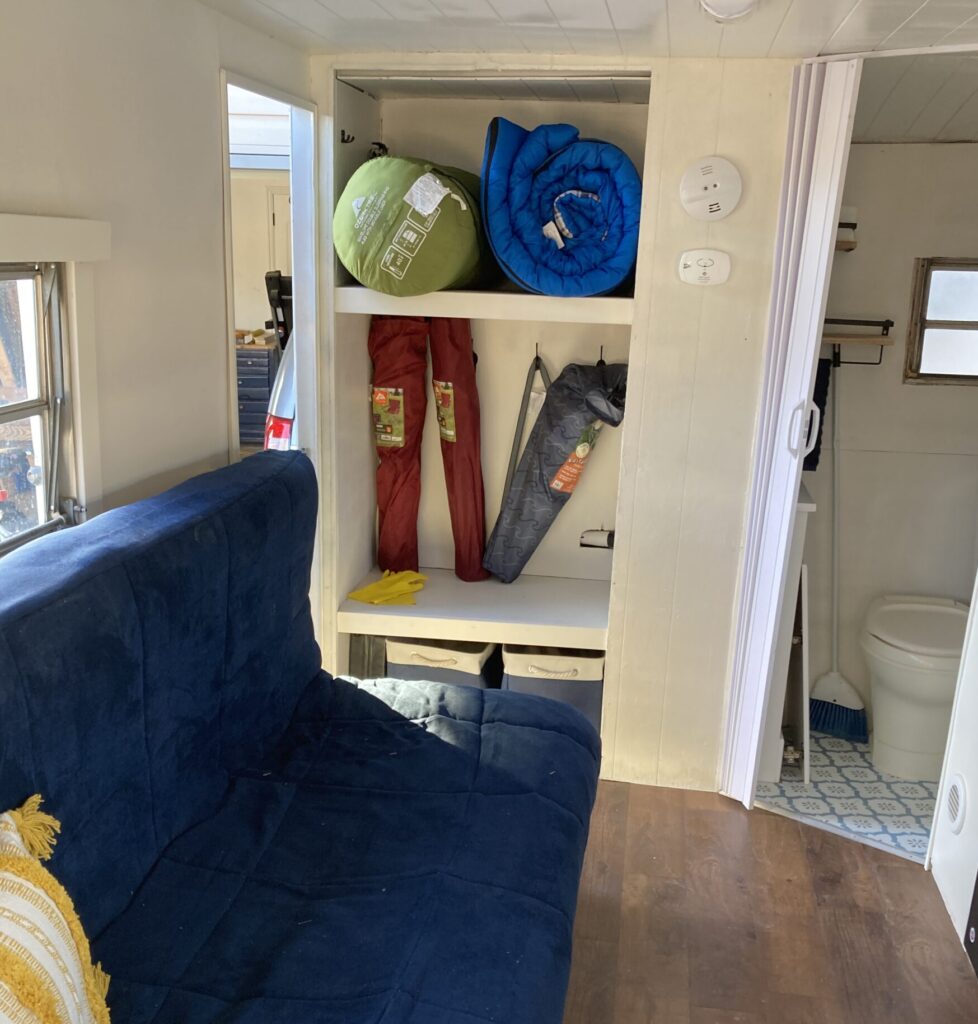
Mudroom/Storage:
This is one of my favorite parts of the trailer. I added storage for sleeping bags, camping chairs, coats, and shoes. These are the storage bins I used at the bottom. And I love them! I put our shoes in there as well as flashlights and a first aid kit.
5. RV Wall and Ceiling Paneling – Camper Remodel Ideas
Ceilings: I used this faux shiplap paneling for my ceiling and I looooove it! It is such an affordable product that looks amazing. Just a warning, hanging ceiling panels is exhausting, make sure to recruit some extra muscles to help hold them up. I used liquid nails and brad nails in altering angles.
Walls: I think they may have discontinued the wall paneling I used for this project because I haven’t been able to find it. But any thin sheet of wall panel would work, like this one. When installing wall panels, use liquid nails and brad nails. Make sure the length of your brad nails isn’t longer than the width of the material you’re nailing into. You don’t want to create any holes in your exterior.

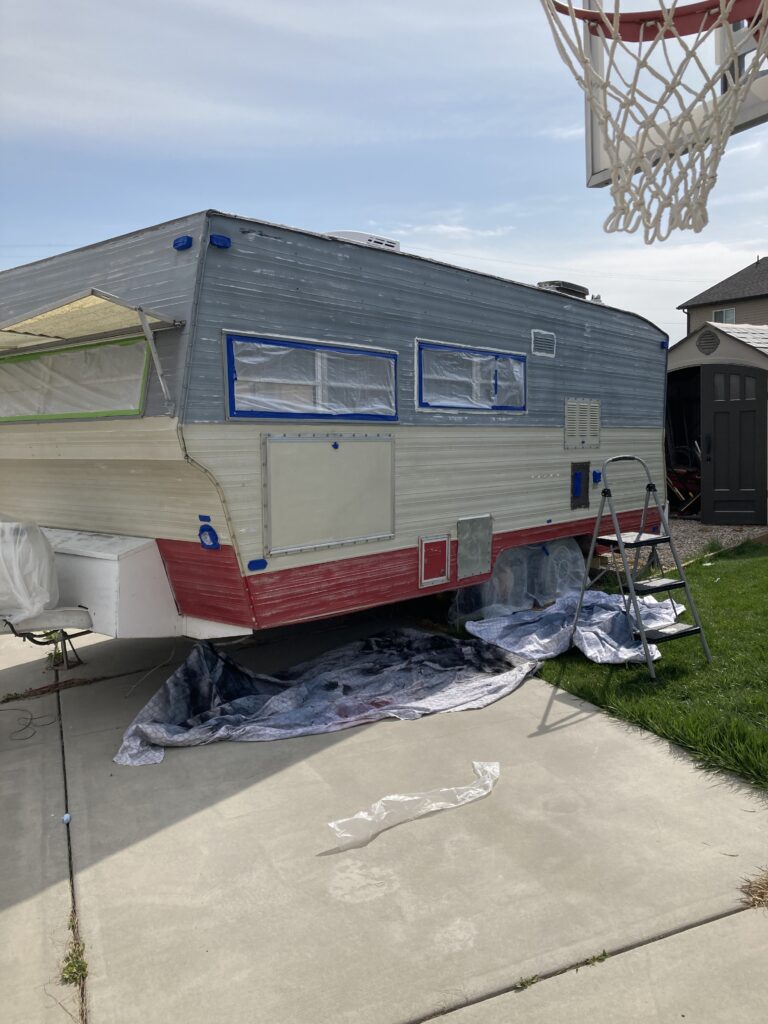
6. How to Paint the Exterior of Your Camper Trailer/RV
Painting the exterior was quite the process! Probably my least favorite part of the experience, but definitely the most satisfying! I know I didn’t do this perfectly, but getting it professionally painted wasn’t in the budget for me. So I did the best I could with what I had and I think it turned out pretty good! Here is what I did to paint the exterior of my camper trailer/RV.
- Deep-cleaned the exterior.
- Thorough sanding (I used 120 grit).
- Rinsed off all dust and allow to dry.
- Apply two coats of primer (I used this primer from Home Depot).
- Apply two coats of heavy-duty exterior paint.
- Add any desired detail work (I added a navy blue stripe).
- Wax the entire exterior.


7. Plumbing, Electric, Propane
Plumbing, electricity, and propane are things you need to take into consideration when you are remodeling your camper trailer. I would recommend hiring these out to a professional. Because the consequences of doing them incorrectly could pose some really sad results.
An RV’s electric system is set up on 12 volt. Not all electricians are experienced in this type of system, so make sure you find someone who has experience with it. These are the LED lights I used for the interior. They are great because they don’t use a lot of energy and drain your battery. This is the exterior light I used.
If you’re looking to get a new fridge, I’d recommend getting a fridge that runs off of propane like this one. This will decrease the load put on your batteries.
Hopefully, you have found some of these camper trailer remodel ideas and tips helpful. Are you renovating an RV? I would love to hear about it! Leave your thoughts in the comments below.
Pin these Remodeling an RV Tips to Pinterest