This post may contain affiliate links. I try to make my posts as helpful as possible and have great products easy for you to access. The use of these links provides me a small commission at no cost to you. As an Amazon Associate, I earn from qualifying purchases.
The Origin of this Homemade DIY Indoor Playground Design
I have two toddlers. They are my whole world. But, they also are tough to keep entertained. Especially during the winter months.
I took my kids to visit an indoor play place to attempt to save my sanity and my kids had an absolute blast.
I mentioned to my sister how much I wished I had a little indoor playground for my kids. And her response was:
“You could just build one!”
It was a helpful nudge to give me the confidence I needed to take this project on.
From that moment on my mind was full of ideas and design plans, and I knew for Christmas that year, I was going to make my kids a homemade DIY indoor playground.
And not only would it be a gift to them, but it would also be a gift to me when I desperately need to run out the kid’s energy before bedtime.
I built this playground about a year before this blog was born. So, unfortunately, I didn’t take step-by-step pictures of the whole process.
But I do have detailed indoor playground design plans (for free!) you can print and use to build your own homemade DIY indoor playground. You can either use the plans and build it exactly as mine is, or you can use it as a general template and add your own personal touch.
In this post you’ll find:
- Supplies and Tools Needed to Build Your Indoor Playground
- Step-By-Step Guide to build your indoor playground
- Free Downloadable DIY Playground Plans
- How much does it cost to build an indoor playground?
Supplies and Tools Needed to Build Your Homemade DIY Indoor Playground
- Supplies
- (10) 2x4x8
- (2) 2x2x8
- (2) 1x2x8
- (1) 1x4x8
- 4×8′ Particleboard
- 4×8′ Hardboard
- 48″ – 1″ Dowel
- Wood glue
- 2 1/2″ pocket hole screws
- Stain (I used Dark Walnut)
- Sealer (I used one-coat polyurethane)
- Primer
- Paint (I used blue, red, green, yellow, and white)
- Rock holds
- Slide (I used this slide from Little Tikes because I had it on hand, I just removed the steps. But my original plan was to build one from plywood. If you do this, just use polycrilic to make it nice and smooth)
- Rope
- 3/4″ PEX pipe
- (4) 3/8 Hex bolt
- (4) 3/8 washer/nut set
- Tools
- Saw
- Drill/Impact driver
- Pocket hole jig
- Brad nailer
- 1″ Spade bit
- Drill bit set
- Lighter
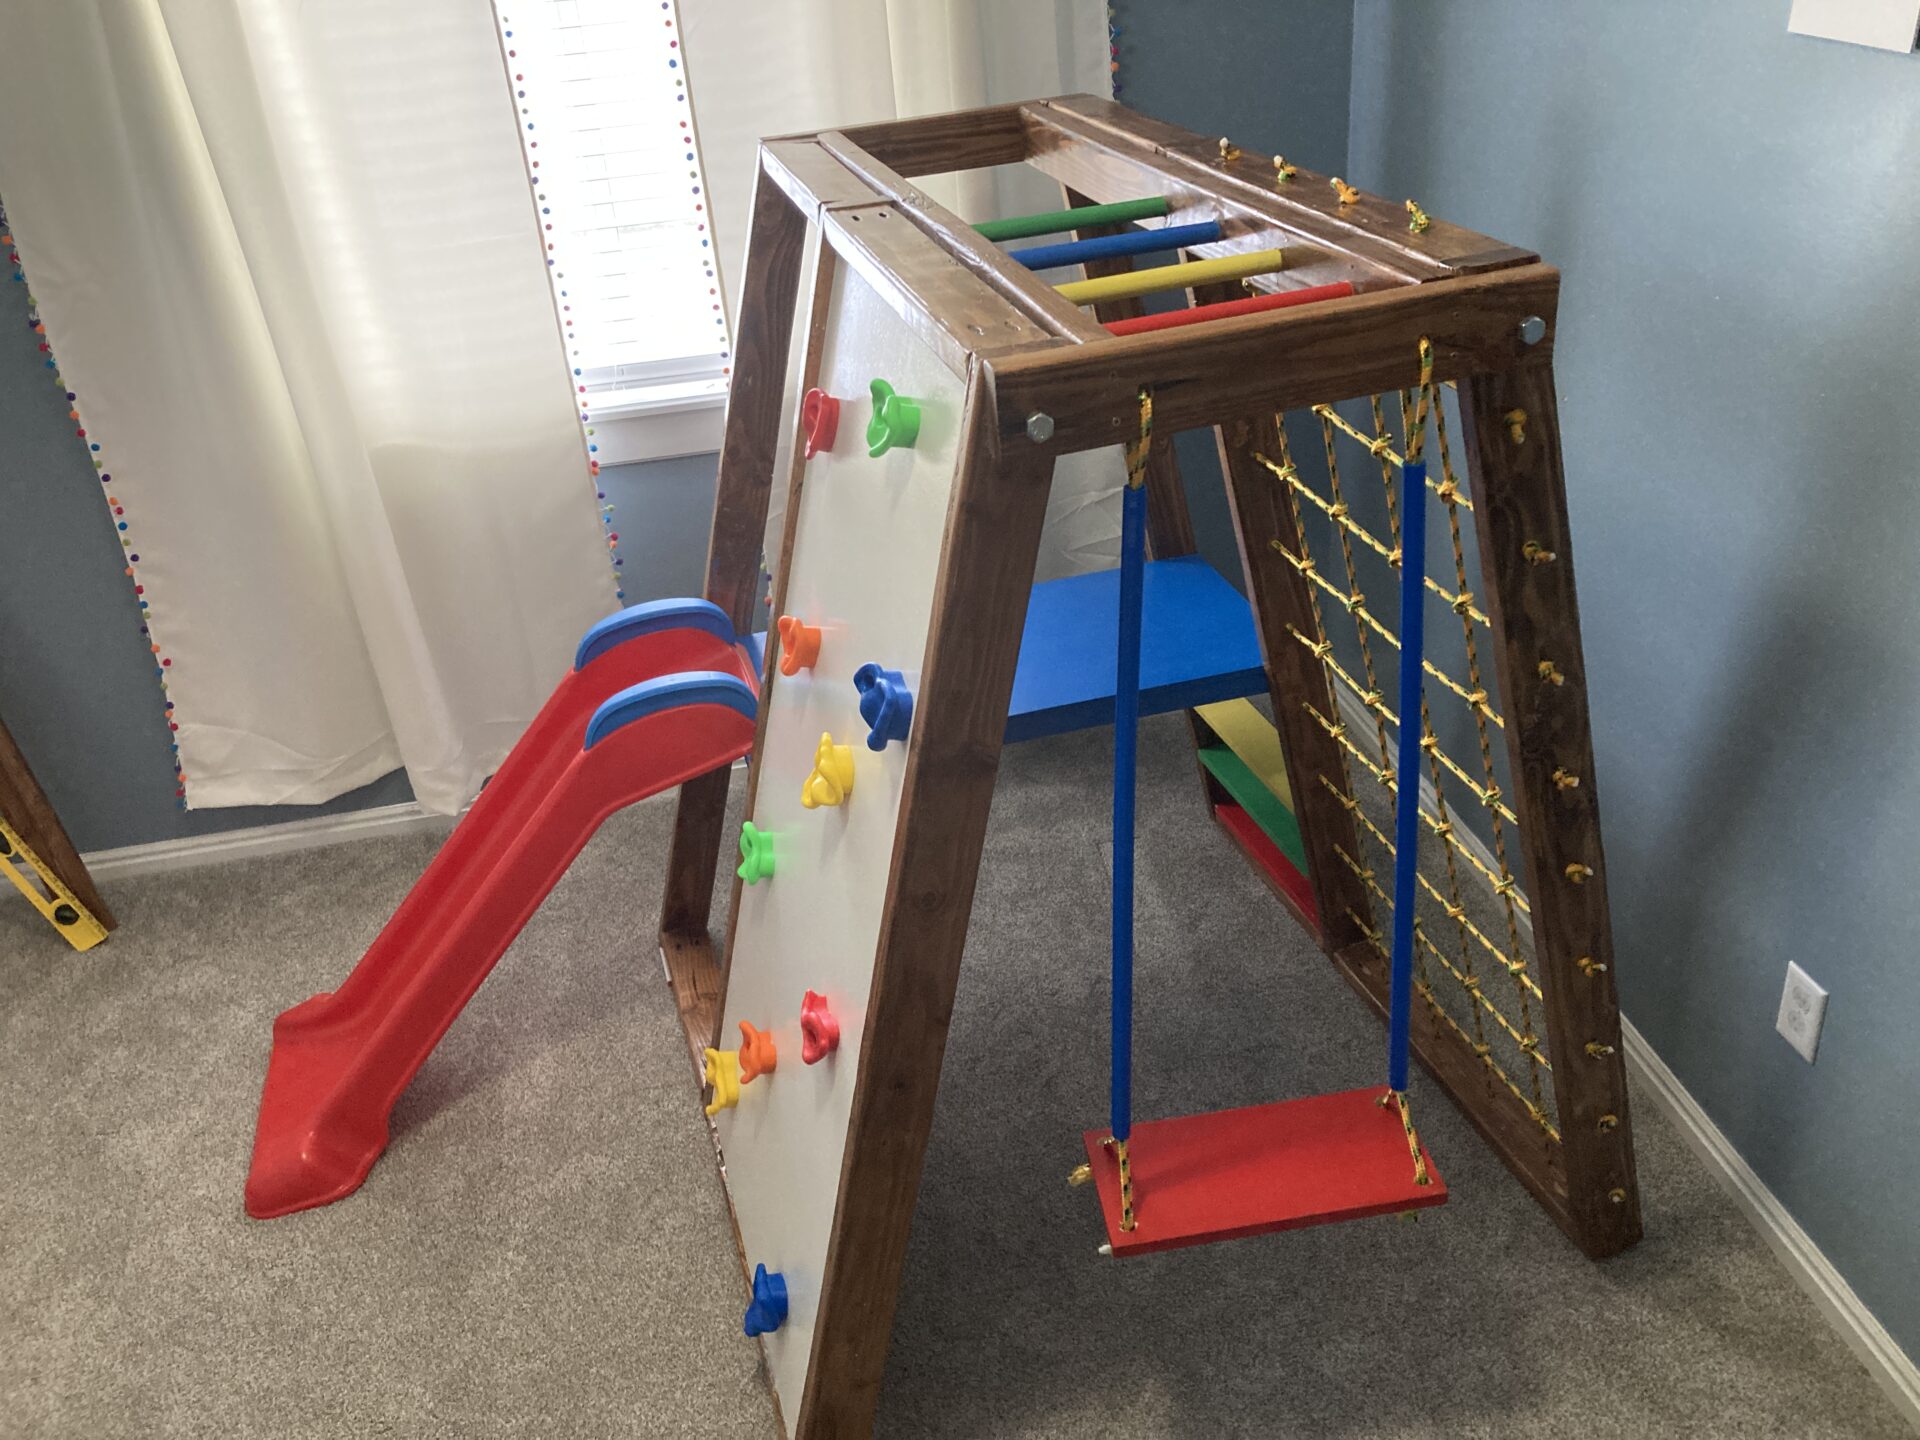
Step-By-Step Guide to Building Your Homemade DIY Indoor Playground
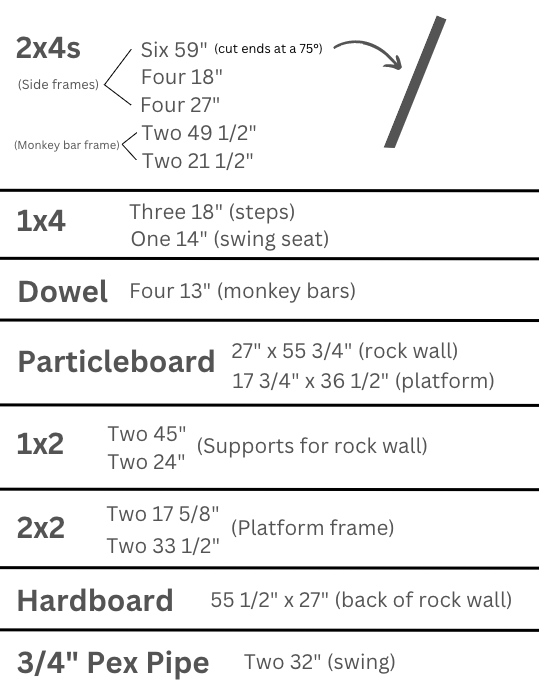
Step 1: Make Your Cuts
With the materials from the supply list above, make the following cuts:
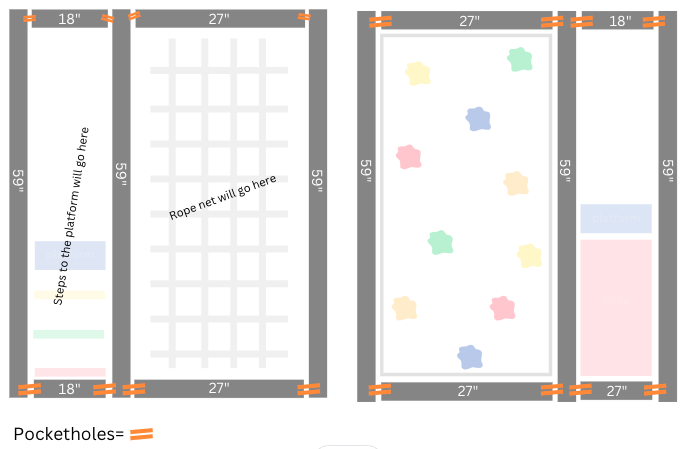
Step 2: Build Side Frames
- Start by assembling both side frames using pocket holes to connect the 2x4s as seen below.
- For an in-depth guide on pocket holes, check out How to Use a Kreg Jig for Perfect Pocket Holes.
- Thoroughly sand all sides of both frames, especially areas around the pocket holes.
- Stain and seal both frames.
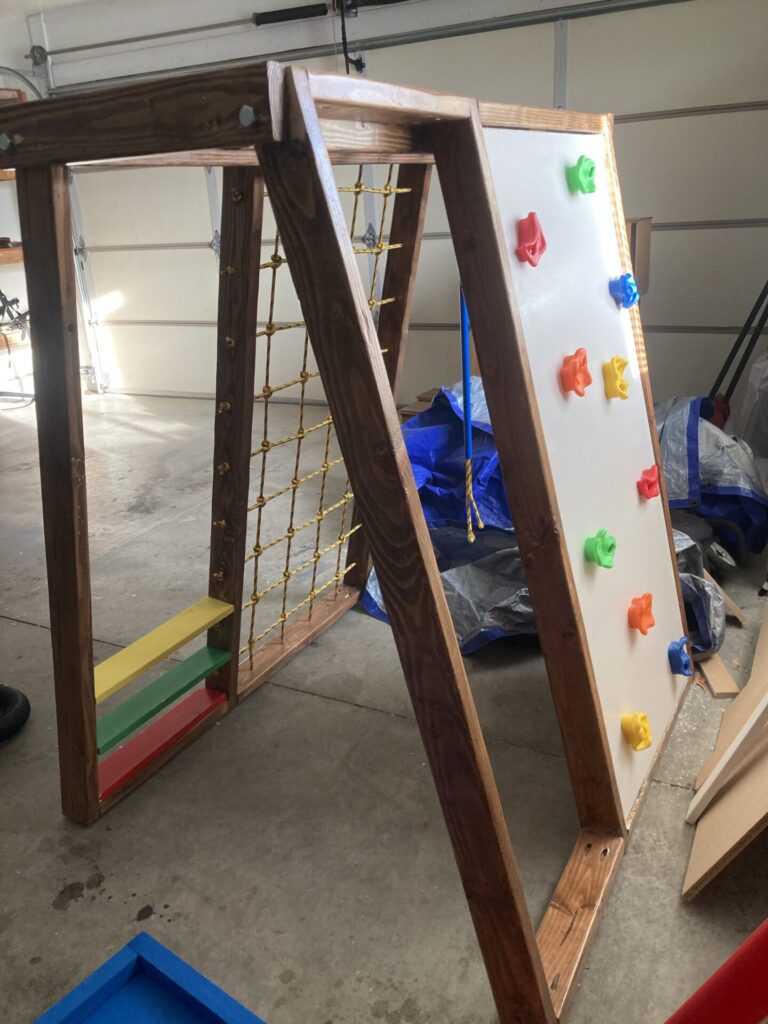
Step 3: Assemble DIY Rock Climbing Wall
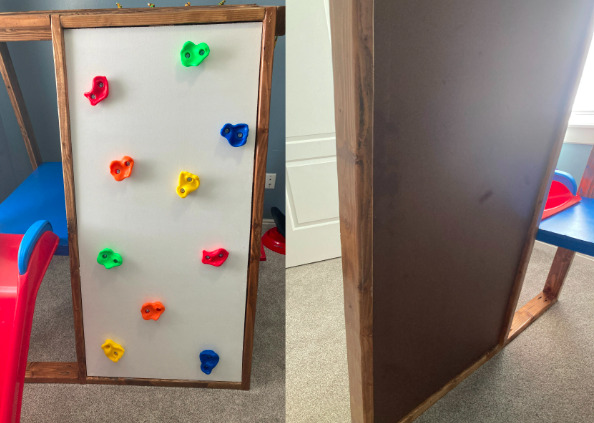
Right: back of rock wall covered with hardboard
- Prime and paint one side of your particle board white. After the paint dries add a coat of polyurethane.
- Brad nail and wood glue 1x2s along each side of the frame that will hold the rock wall. You want them to be set in about 1 inch so the particle board can sit inside the frame.
- Set the particle board against your braces and brad nail/wood glue it into place.
- Spread out your climbing rocks and decide where you want them placed. Mark the holes, drill, and attach.
- Brad nail your hardboard to the back of the rock wall. This will cover up the exposed bolts from the rock holds.
Step 4: Assemble Rope Wall
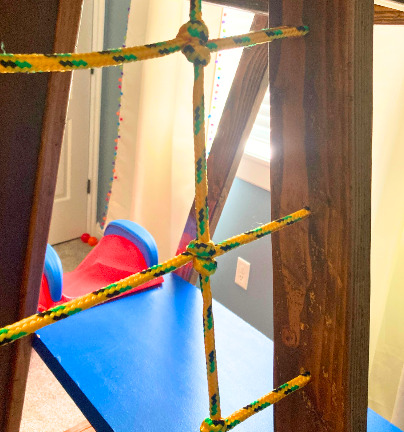
- With a 3/8″ bit, drill a hole every 6″ along each side of the rope wall square. You should end up with 4 vertical ropes and 9 horizontal ropes. I recommend measuring and marking all the holes before drilling.
- Start by tightly tying all your horizontal ropes. Using a lighter to melt each knot.
- Then you will start your vertical rows tying a know at each cross-section. This video is especially helpful for the specific knot needed. Start at the 2:05 minute mark.
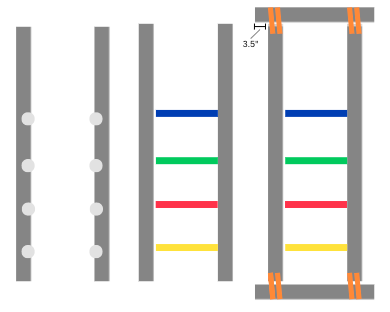
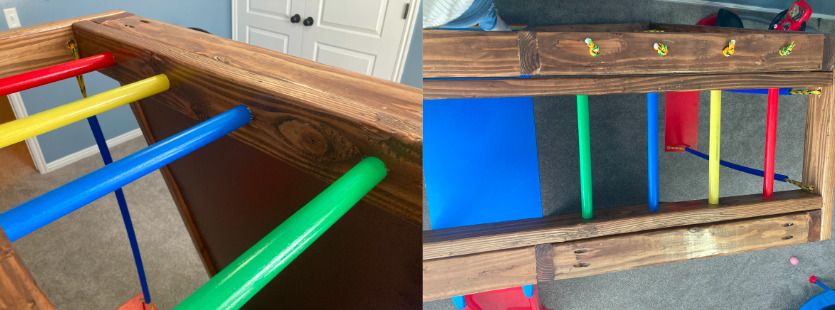
Step 5: Assemble Monkey Bars
- Sand, stain, and seal the four 2x4s included in this portion.
- Paint the monkey bar’s desired color, and allow time to dry.
- Using a 1″ spade bit, drill a hole every 5.5″ inches, on the inside edge of your two 49 1/2″ 2x4s. The hole created by the spade bit should be 3/4″ deep.
- Add wood glue in each drilled hole, and insert monkey bars.
- Attach end pieces to monkey bars. There should be 3.5″ excess on each side, this will be where you attach it to the main side frames.
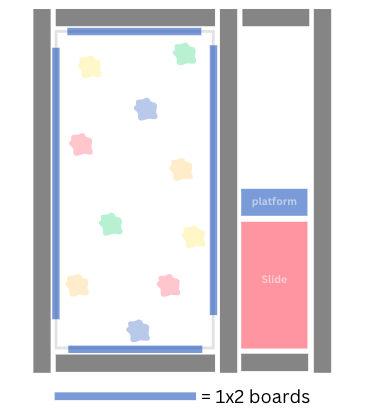
Step 6: Build Slide Platform
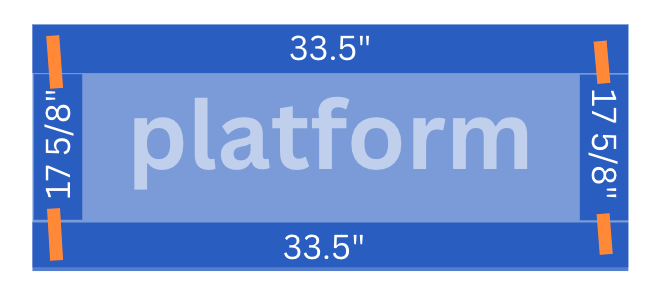
- Create a rectangular frame with your 2x2s using pocket holes.
- Brad nail and wood glue the particle board to the rectangular frame.
- Paint the platform your desired color.
- The platform will be connected to the frame in step 9.
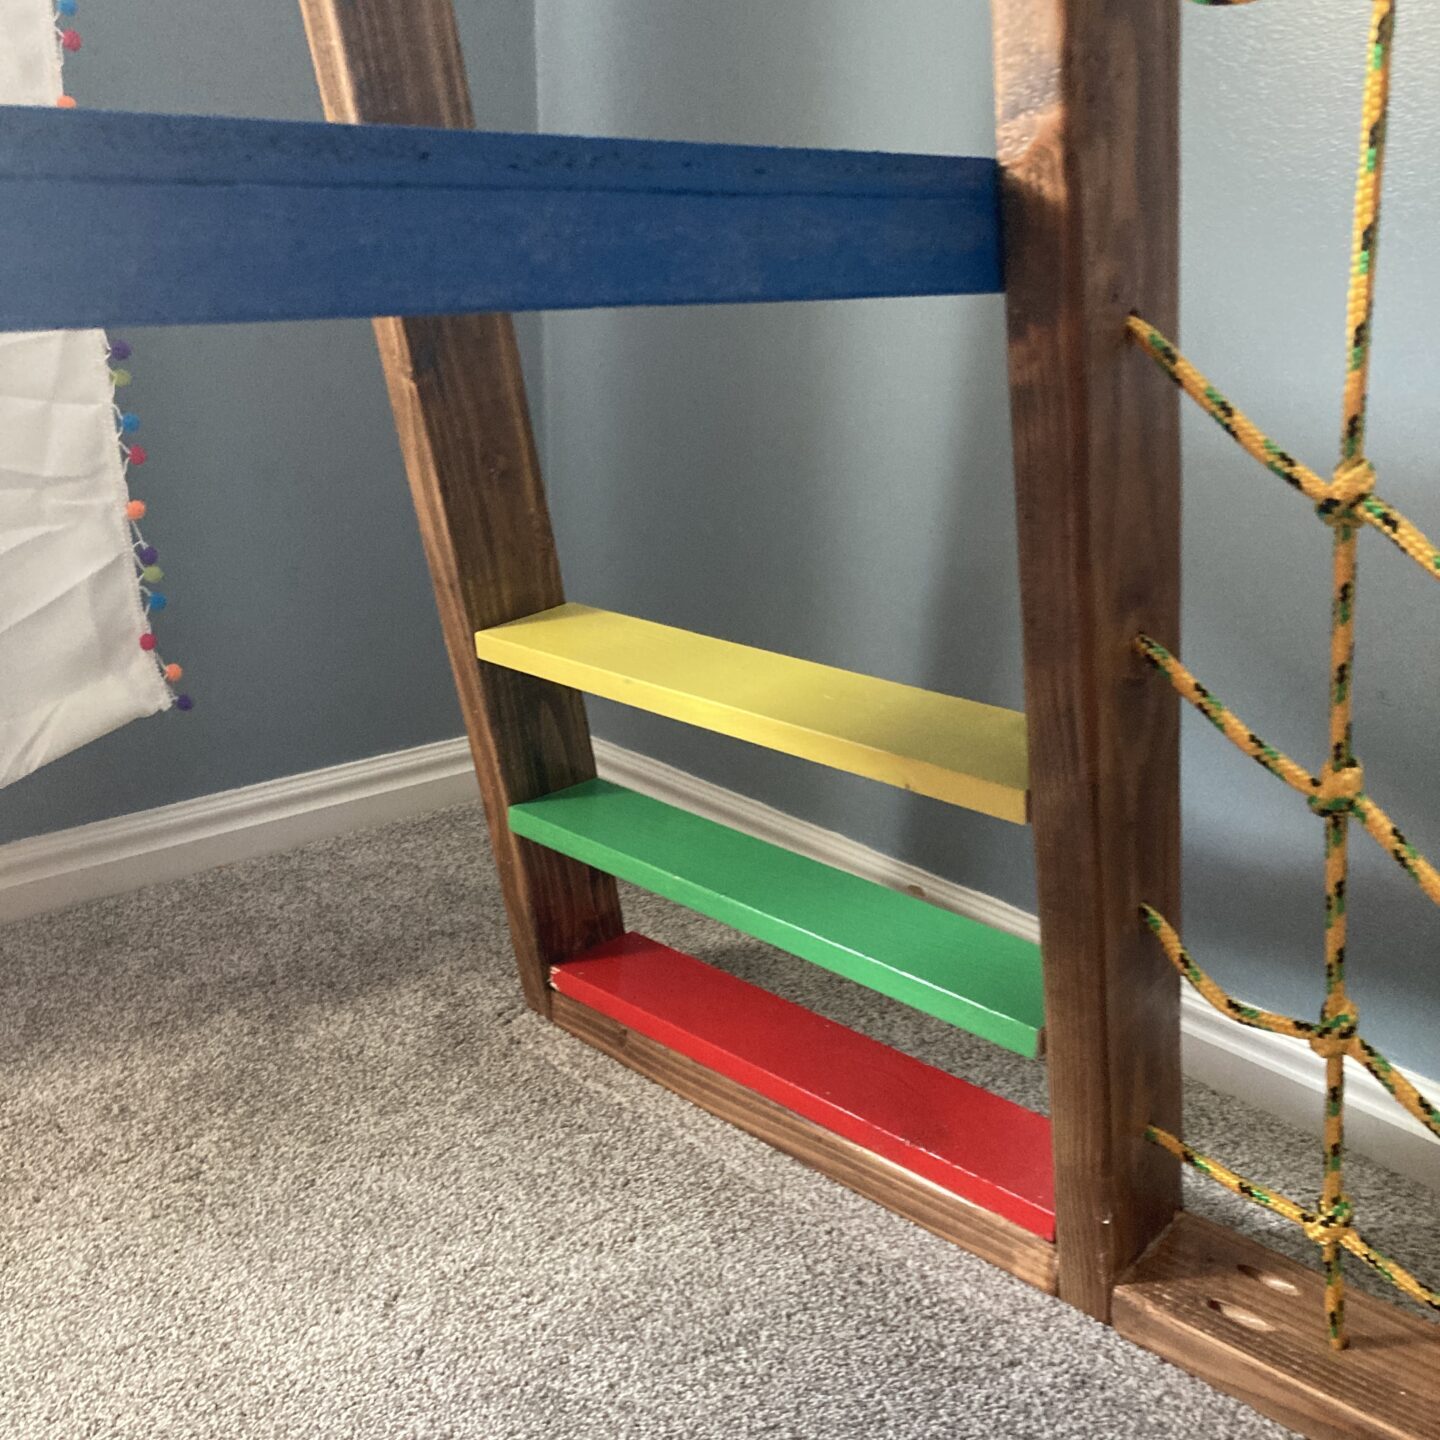
Step 7: Add Steps to the Platform
- Paint your three 1×4 boards your desired color.
- Attach to the section next to the rope wall using pocket holes. Start with the first step resting on the bottom frame. Then attach the other two 5.5″ inches apart angled to about 75 degrees (match the angle of your bottom piece).
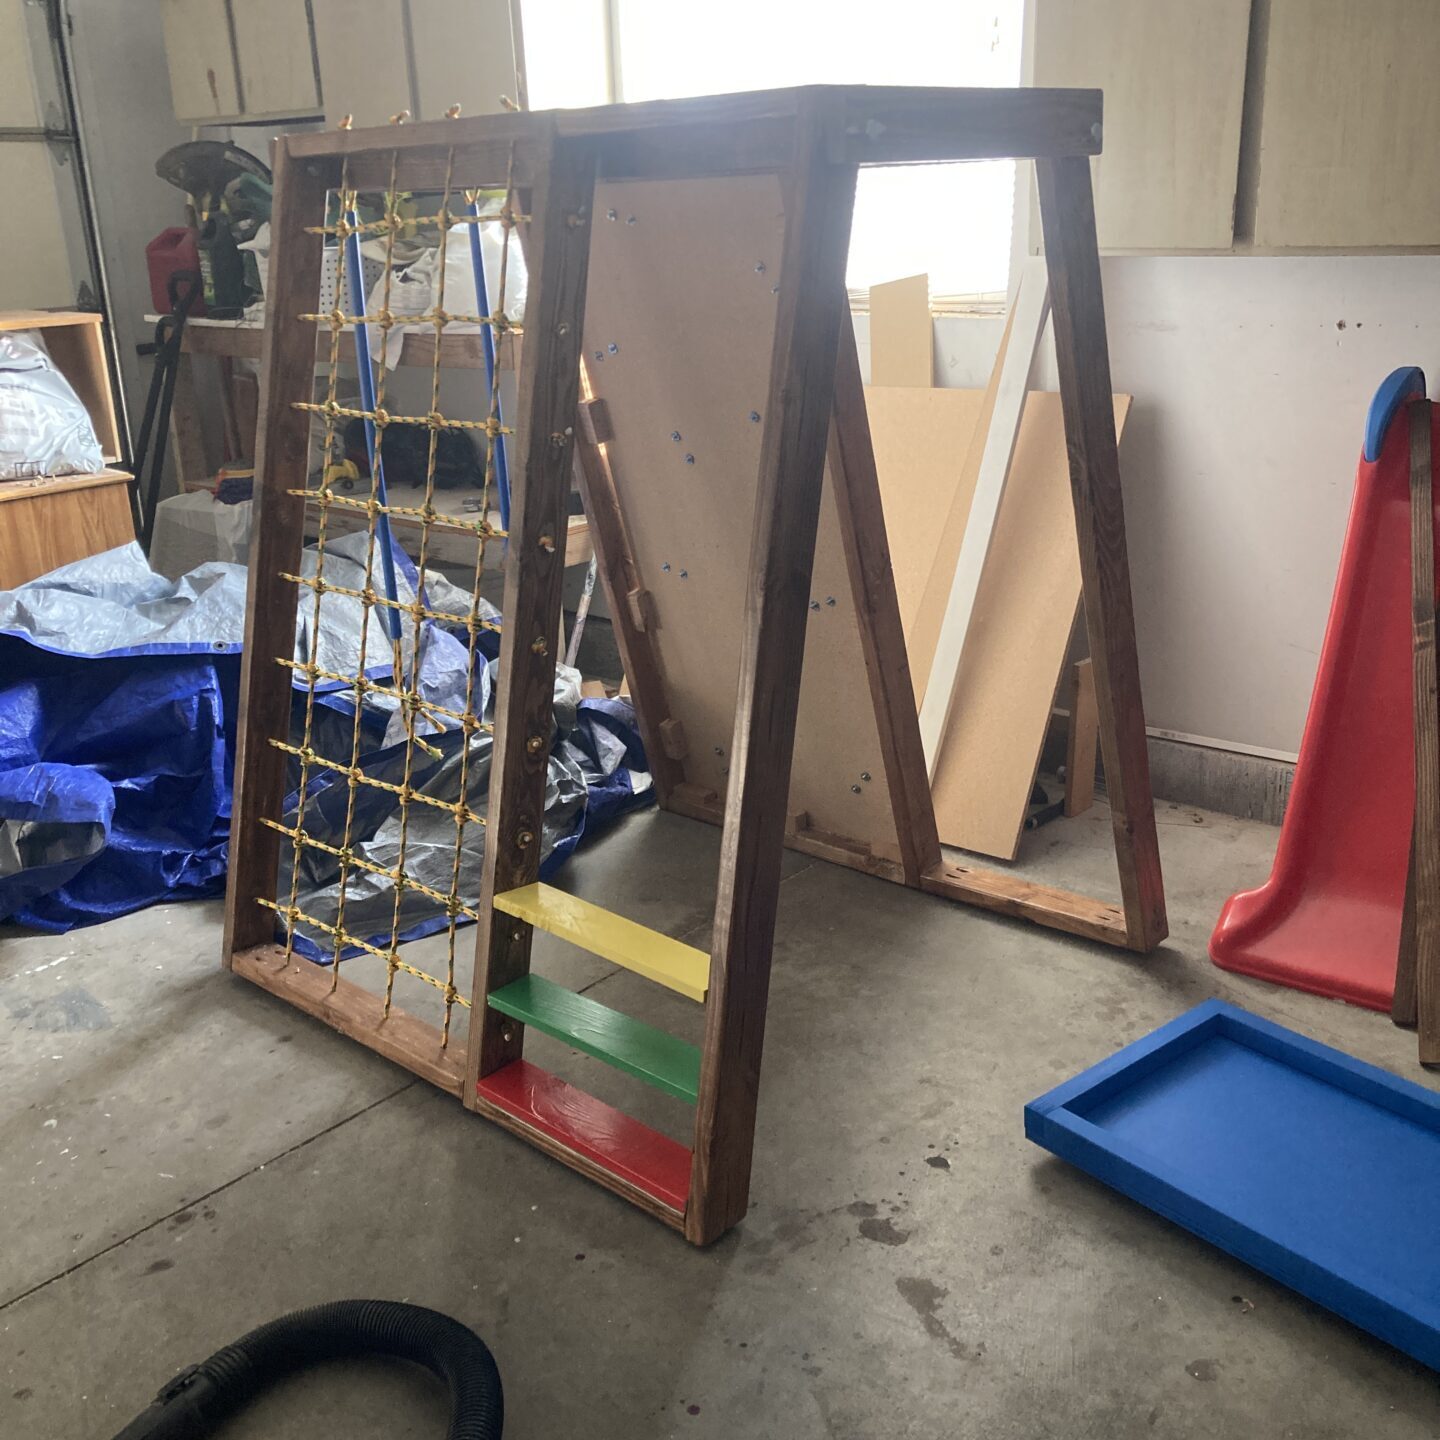
Step 8: Connect Three Main Pieces of DIY Climbing Frame
Here is where it gets a little tricky. You’ll want at least two if not three, people to assist with this step.
- Have one person hold up one side of the main frame (either rock wall or rope wall side). Then have one or two people lift up the top frame (with the monkey bars). The top (monkey bar) frame should slide on snuggly against the outside of the main side frame.
- Drill a 3/8″ hole from the outside of the monkey frames through the main frames. This is where your bolts will go.
- Slide the bolt through the frames and tighten the nut and washer.
- Do the above steps for all four corners.
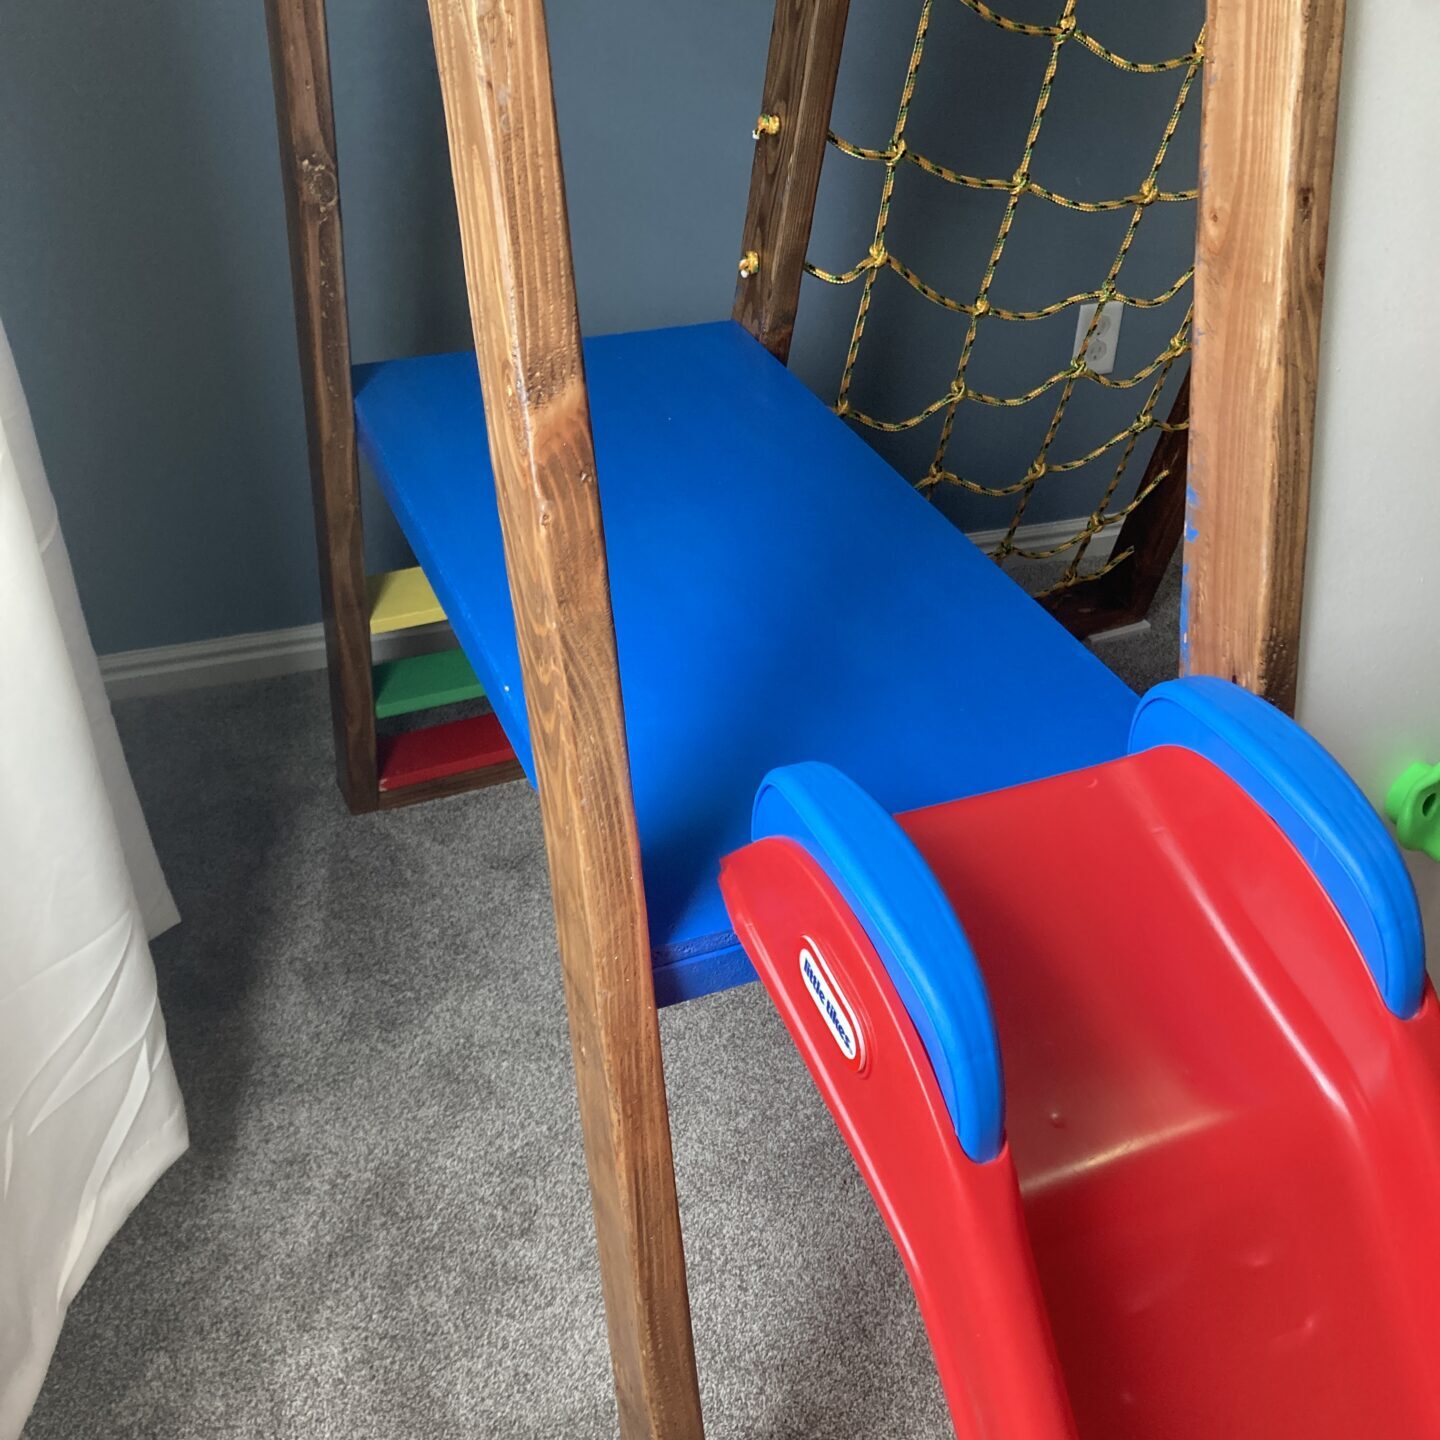
Step 9: Add Platform
- Take the rectangular platform you built in step 6 and slide it in between the gaps above the steps. You may need to adjust the angle of your frames a little. Place the platform 23″ from the ground.
- From underneath, screw through the 2×2 into the 2×4 frame on all four corners. Add L-shaped brackets if needed.
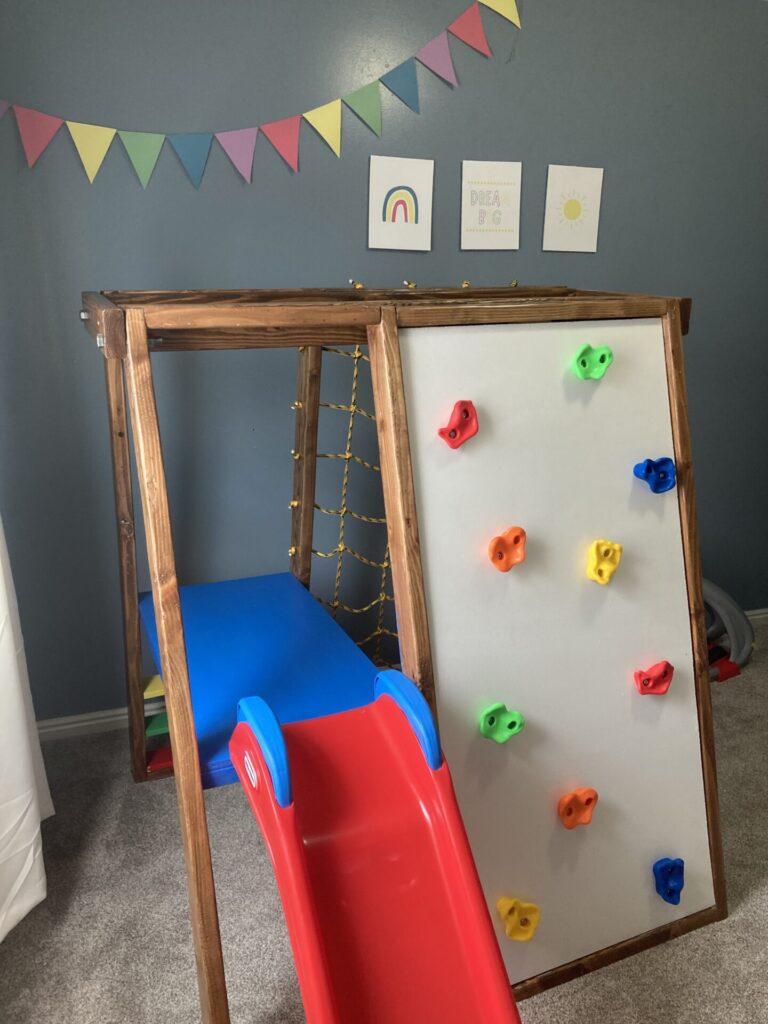
Step 10: Add Swing and DIY Slide
As I mentioned earlier, I used this Little Tikes slide. I liked the ease and convenience of it. Plus I had it on hand. Originally I was going to use plywood to build a slide, so that is definitely an option too!
- To attach the slide, I removed the little blue handles and screwed through the plastic into the platform. The handles went back on easily and it has held together great!

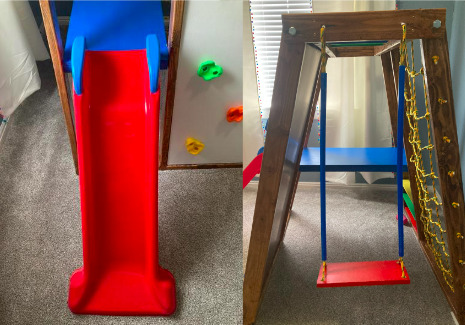
- For the swing, drill two holes in the top piece on the side of the monkey bars. Thread the rope through so it hangs down about 40″.
- I was nervous about strangulation (I have an anxious mind…) so I threaded the rope through 3/4″ PEX pipe so I can let my kids play unsupervised without too much worry.
- For the seat of the swing, I actually used a piece of scrap wood I had on hand, it was a 1×8 board. For this set of instructions, I just recommended using the excess 1×4 board that was used for the steps as the seat of the swing. That way you buy a little less and waste less.
- Simply drill four holes in each corner of your “seat”. Thread the rope through, tie a knot and melt the knot with a lighter.
Free Downloadable DIY Playground Plans
How much does it cost to build a DIY Jungle Gym?
Cost Breakdown of DIY Indoor Jungle Gym
The numbers below are not exact but are close estimates. Prices may vary depending on inflation.
When I was first looking at Etsy for an indoor jungle gym, the costs had me really discouraged. For a playground with this many features and this size, I was looking at $600+. So to make my own for around $250 wasn’t too bad! Plus I had a lot of supplies on hand, so it ended up being just under $200 in my case.
- Wood………………….$90
- Screws………………..$9
- Stain & Paint……….$70
- Rock holds………….$19
- Slide……………………$40
- Rope…………………..$5
- PEX Pipe……………..$9
- Bolts & washers…..$14
Estimated total cost: $256
I hope this homemade DIY indoor playground brings your family as much joy as mine! The building process is a bit intensive, but it is totally worth it in the end!
For fun playroom decor printables, check out 8 Colorful and Fun Playroom Printables – For Free!
Want to save or share this Homemade DIY Indoor Playground? Pin it on Pinterest!