This post may contain affiliate links. I try to make my posts as helpful as possible and have great products easy for you to access. The use of these links provides me a small commission at no cost to you. As an Amazon Associate, I earn from qualifying purchases.
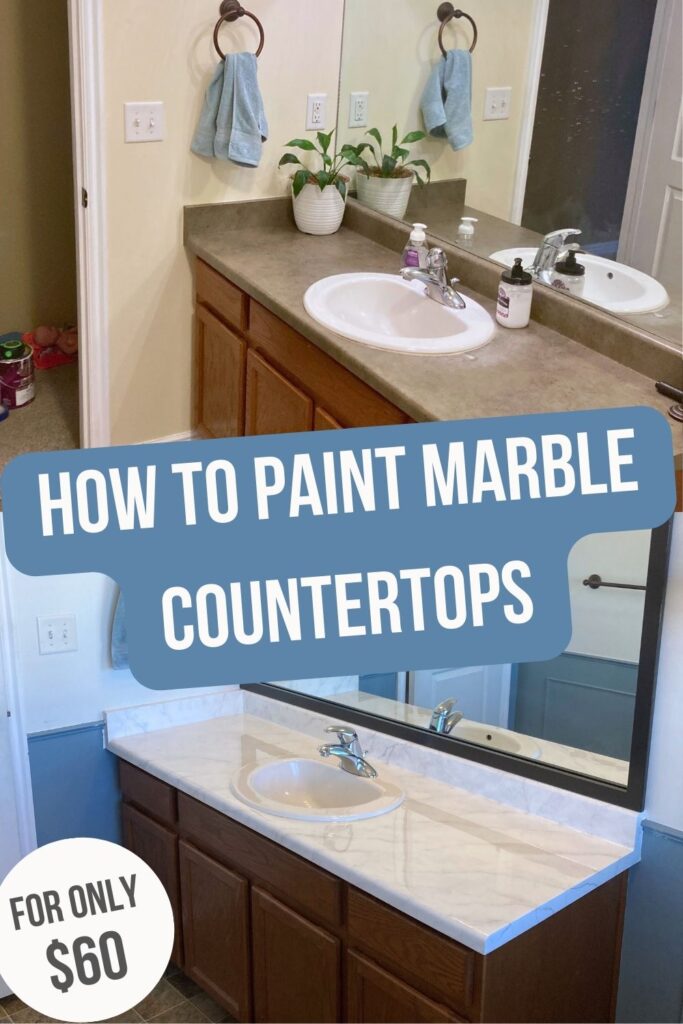
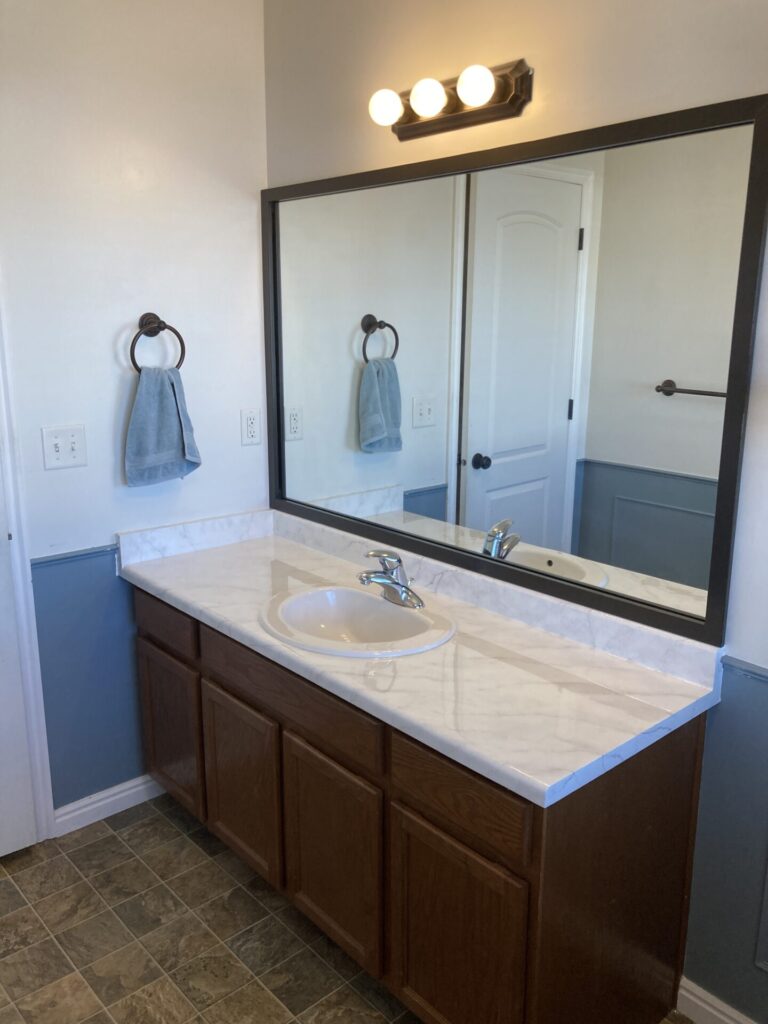
Slowly but surely I am updating my guest bathroom piece by piece. The next part I am tackling is the vanity. Since I am working with a tight budget, I couldn’t add new countertops. So I am going to refinish the bathroom vanity top with DIY Marble Counters using paint and epoxy. And I am stunned at how they turned out. I absolutely love it and can’t believe it’s just paint and epoxy.
Join me as I share the steps I followed to make my DIY Marble Counters.
Jump to the DIY Marble Counter Video.
Supplies You’ll Need for Marble Looking Counters:
There is an awesome kit from Amazon that includes everything you need. But, I was able to put together my own “kit” with some paint samples and a separate epoxy kit. Either option is great, but if you’re looking to save a little money, this is a great option!
- White paint
- Grey paint
- 2-inch brush
- Fine point brush
- Painters Tape
- Spray bottle
- Rag
- Epoxy kit
- Heat gun (or blow dryer)
- Silicon caulk
Steps for Painting Marble Counters:
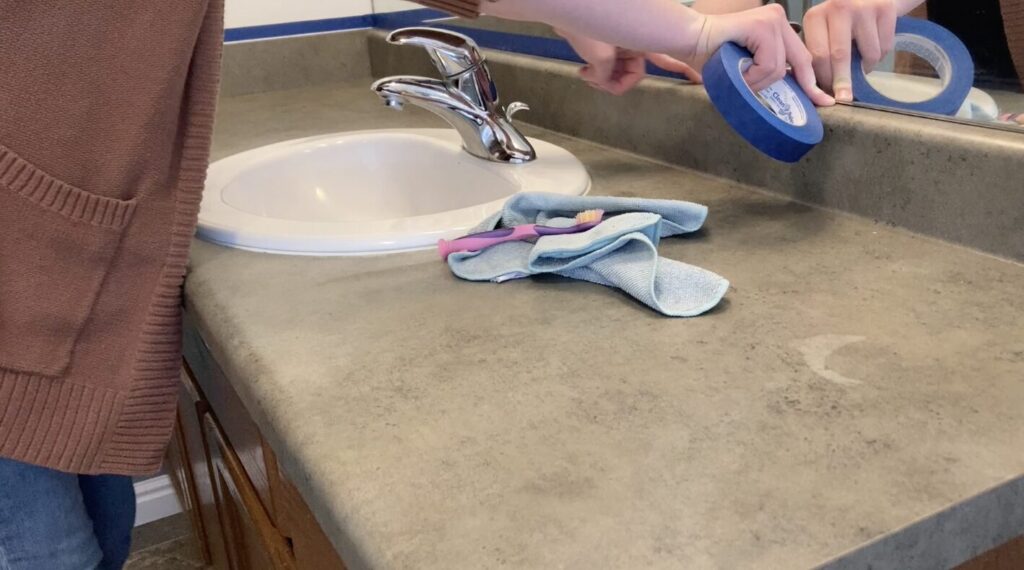
Step 1: Prep Your Surface
Start by deep cleaning your surface.
Remove any old caulk around the edge of the countertop and sink (we’ll add a fresh coat at the end). I like this caulk remover tool for this part.
Then tape off all the edges of the counter and around your sink. Include a drop cloth or plastic covering against your cabinets. You don’t want paint or epoxy dripping down the sides or onto your floor.
I had a plastic tablecloth on hand that worked great to cover my cabinet doors!
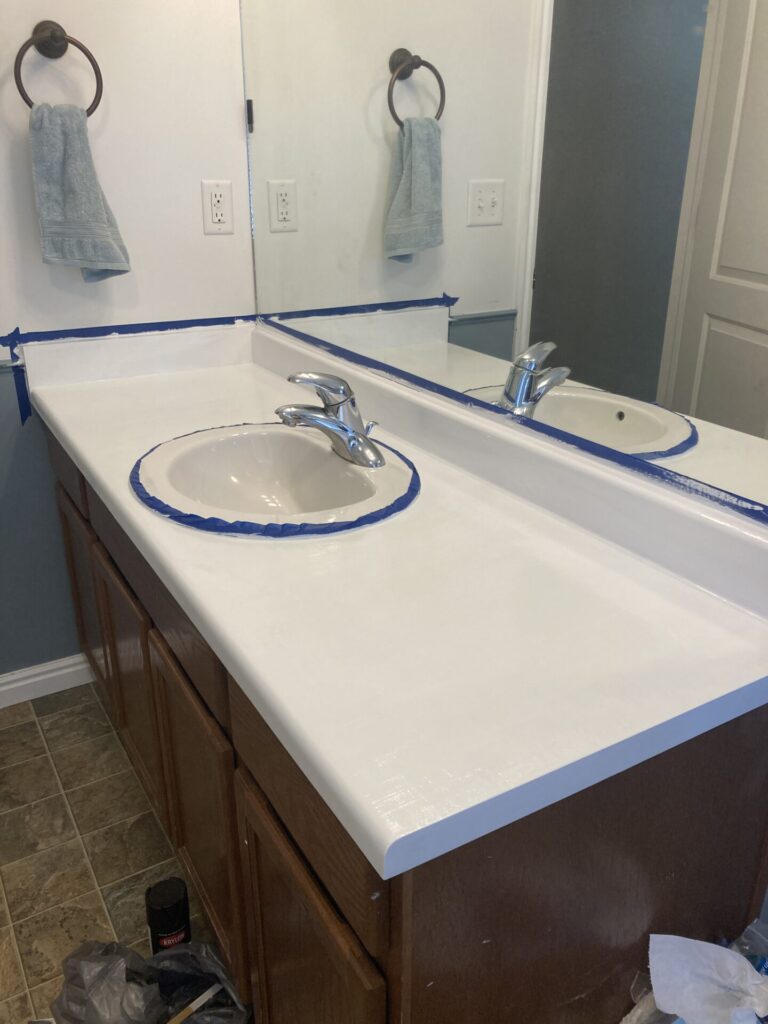
Step 2: Prime
Now paint on a coat of primer. Depending on the darkness of your countertop, it will take anywhere from 2 to 6 coats. I added 4 to mine. Wait about 1 hour between coats.
Step 3: Add Veining to Your DIY Marble Counters
Now for the fun/stressful part. Add veining!
Take a moment to look at pictures of marble that you like. Map out a rough plan of what you want your marble to look like and the direction you want your veins to go. Practice on a piece of paper or scrap wood.
A spray bottle will be your best friend for this. It helps create natural-looking veins. Plus, if you paint one you don’t like, you can easily wipe it off.
Start by spraying the areas you plan to work in. I began by lightly sponging on grey paint randomly across my surface. Then dabbing most of it up with a rag. This gave a nice cloudy layer to start with.
Spray again, then using a fine-tip brush and the grey paint, lightly twirl your brush along the surface of the countertop. You’ll slightly spin the brush between your fingertips as you go. This will help create a random vein pattern.
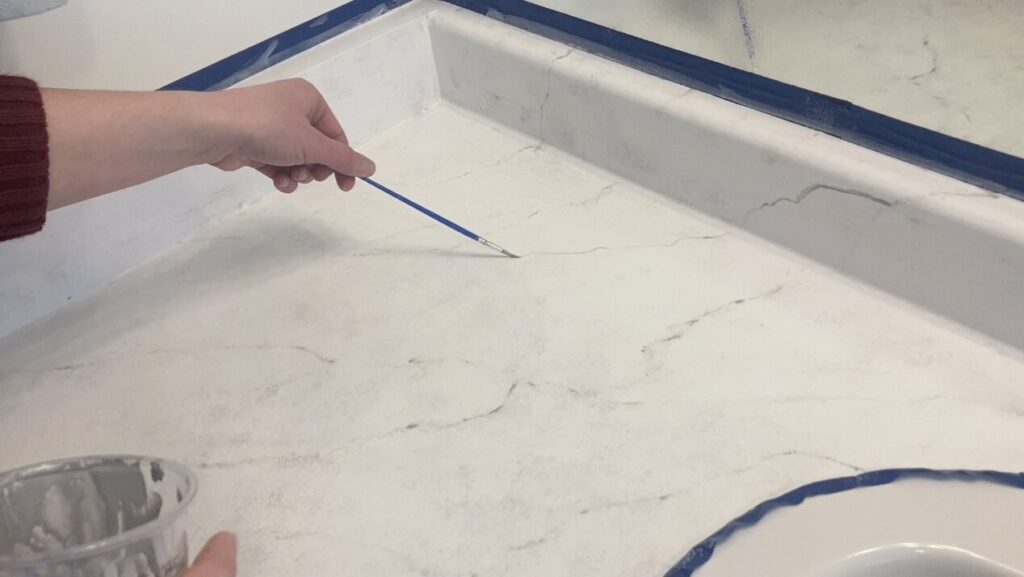
Then using a 2-inch brush or a bristle brush, quickly dab up and down to blend the painted vein. Create variation in your vein by dabbing heavily in some spots and lighter in other spots. If you feel it needs more blending, dab it with a rag.
Repeat these steps in a random pattern all over your surface. Once your grey veins are done and dry, add some white accents to give more depth. You could even water down white paint and completely paint over your grey veins to give more depth.
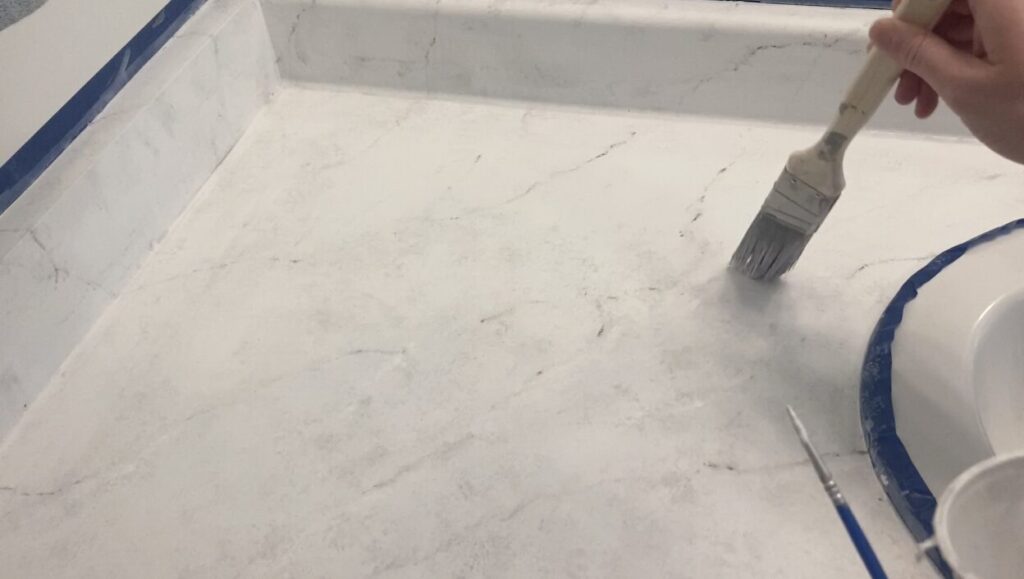
Step 4: Finish with Epoxy
Once all your paint is completely dry, it’s time to epoxy the countertop! This is what really makes it look real.
Start by completely removing any dust or any particles on the surface.
Your epoxy kit will have two parts. Make sure to follow the instructions that come with your epoxy, but some sets I have purchased in the past didn’t have great instructions.
Two helpful reminders:
First, the mistake I have made the most in the past is not using enough epoxy. You want to use MORE than enough. You’d rather have it dripping off the edge not thinly spread.
Second, make sure the two parts are equal and mixed thoroughly. Mix the two parts for at least 3-5 minutes. It may feel excessive, but if it’s not completely mixed, your epoxy might have patches that never dry and you don’t want that.
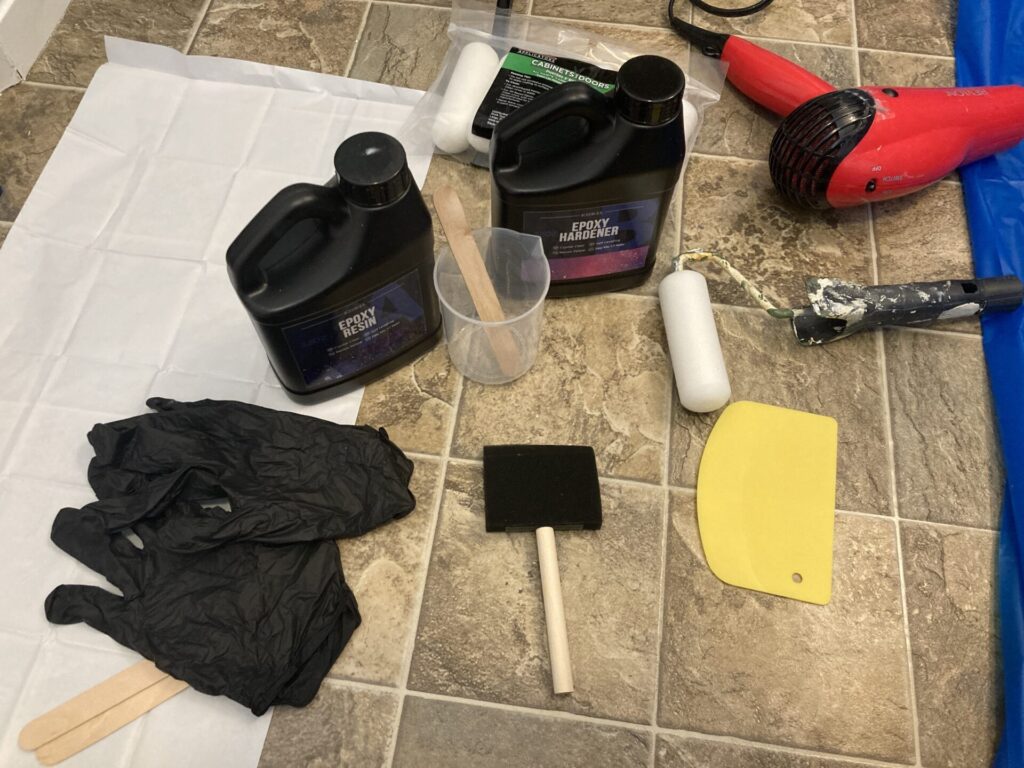
Below is a picture of the supplies I had on hand to epoxy the countertop.
Latex/disposable gloves are a must. Epoxy doesn’t wash off very easily. A small foam brush and a foam roller were perfect for quickly spreading the epoxy and getting it spread along the backsplash.
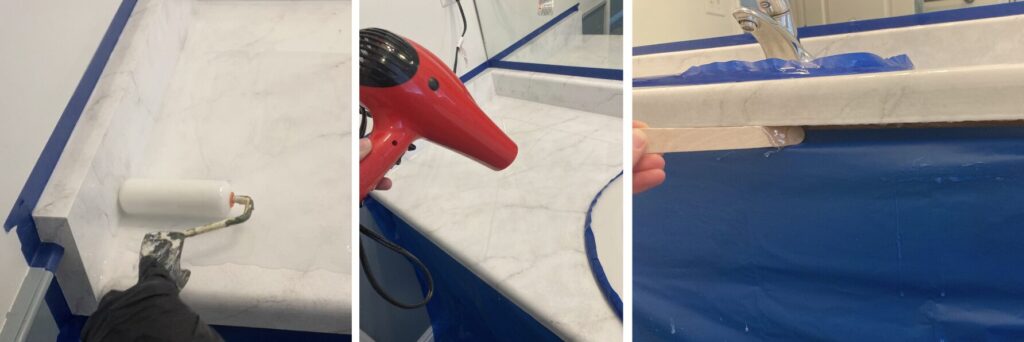
Once your surface is prepped and your epoxy is mixed, pour it over your countertop. Use a roller to gently spread it out, making sure to completely coat everything.
Using a heat gun or blow dryer, go across the entire surface and pop any bubbles. It might not look like there are any from a distance, but there are! Make sure your blow dryer cord doesn’t drag in your epoxy.
Using a popsicle stick or something similar, scrap along the bottom edge to remove any drips. You’ll want to go back and do this 3-4 times within the first hour or so.
Don’t wait very long, or at all, to remove the tape from around the edges. Once the epoxy dries, it is hard as a rock. And if you pull the tape even an hour after applying the epoxy, it has already begun to dry, and removing the tape could compromise the seamless look of your epoxy.
Allow the surface to dry completely. It takes about 24-72 hours for it to cure. But they typically recommend no heavy-duty use for a week.
Apply a bead of silicone caulk along the edge of your sink. And you are done!
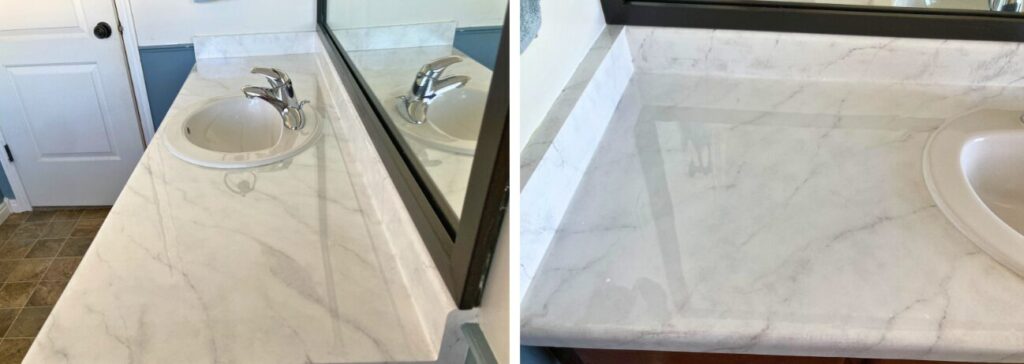
I am so thrilled with how my marble countertops turned out. It’s such a breath of fresh air and SUCH an affordable update.
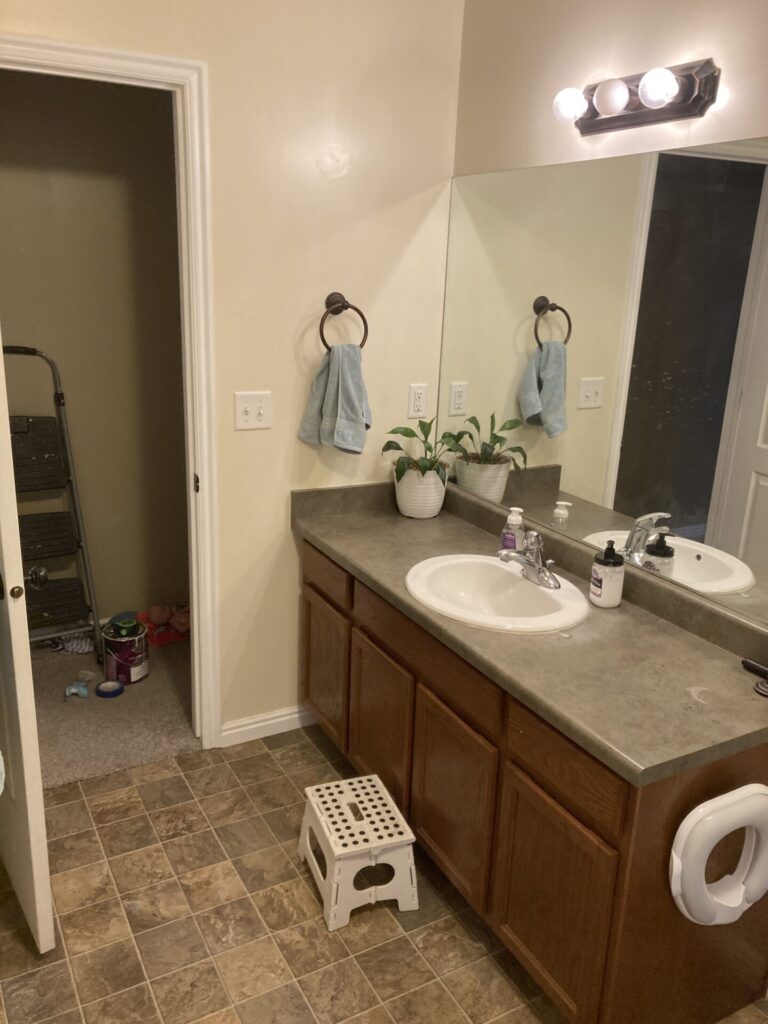
BEFORE:
AFTER:
The epoxy has such a glassy effect, it was hard to capture pictures without reflections in it. But I am in love with it!
Video: DIY Marble Counters
Now to paint the cabinets and add hardware… the fun never ends!
If you liked this bathroom update, make sure to check these ones out too:
Pin DIY Marble Counters to Pinterest: